
Mold on wallboard: how to spot it, remove it, and stop it from coming back

Mold on Wallboard: How to Spot It, Remove It, and Stop It Coming Back
Discovering mold on wallboard is one of those homeowner moments that stops you in your tracks. Whether you spotted dark patches behind the bathroom mirror or noticed a musty smell near the basement stairs, you’re now dealing with a problem that demands attention. The good news: with the right approach, you can identify the source, safely remediate the damage, and prevent mold from returning.
This guide walks you through everything you need to know about mold on wallboard—from immediate first steps to long-term prevention strategies that actually work.
Quick Answer: What to Do First If You See Mold on Wallboard
When you spot visible mold on your wallboard, you’re looking at the symptom of an active moisture problem. Mold doesn’t appear randomly—it requires water, and that water came from somewhere. Your priority within the first 24–48 hours is to stop the moisture source, contain the affected area, and decide whether this is a project you can handle safely or one that requires professional mold remediation services.
Small areas of surface mold on painted wallboard—typically under 10 square feet—are often manageable for a careful homeowner. Larger infestations, hidden mold behind walls, or recurring growth usually require a licensed mold remediation contractor with specialized equipment.
Immediate actions to take:
Isolate the room by closing doors and covering openings
Turn off HVAC to that zone to prevent mold spores from spreading through ductwork
Photograph the damage from multiple angles with dates for documentation
Avoid scrubbing dry mold without proper protective gear—this releases spores into the air
Identify the moisture source (leak, condensation, high humidity) if you can
Typical timelines vary depending on your approach. DIY treatment of a small area may take several days including dry-out time and patching. Professional remediation is often completed in 1–3 working days once the crew is scheduled, though severely damaged areas may require additional reconstruction time.
If in doubt, stop and call a pro.
Finding and fixing the moisture source before or during mold cleanup is non-negotiable. Otherwise, you’ll be right back where you started within weeks.
Why Mold Loves Wallboard (Drywall, Sheetrock, and Gypsum Board)
Modern interior walls are almost universally constructed with paper-faced gypsum board—known interchangeably as drywall, Sheetrock, or wallboard. This material revolutionized construction when it became standard in the early 20th century. Unfortunately, it also created ideal conditions for mold growth when moisture enters the picture.
Understanding why wallboard is so vulnerable helps you make better decisions about prevention and remediation.
Paper facing equals food: The paper layers sandwiching the gypsum core are made of cellulose, which serves as a primary nutrient source for common indoor molds like Aspergillus, Cladosporium, and Penicillium. Mold releases enzymes that break down this cellulose for nourishment.
Gypsum acts like a sponge: The gypsum core absorbs and retains moisture from leaks, roof failures, plumbing pinholes, and chronically high indoor humidity. Once saturated, wallboard can hold moisture for days or weeks—plenty of time for mold colonies to establish.
Rapid colonization: Mold can begin growing within 24–48 hours on wet wallboard. The growth often remains hidden behind paint, wallpaper, or paneling until significant damage has already occurred.
High-risk locations: Bathrooms, basements, laundry rooms, and exterior walls in humid climates (Gulf Coast states, Pacific Northwest, coastal regions) see the highest rates of wallboard mold problems.
Consider this scenario: a 1/2-inch copper pipe develops a pinhole leak inside a second-floor bathroom wall. The drip is slow—maybe a cup of water per day. Within a week, the wallboard has absorbed enough moisture to support mold growth. Within three weeks, mold colonies have spread across several square feet of the wall cavity, all while the painted surface shows nothing more than a faint discoloration.

Common Moisture Sources That Trigger Mold on Wallboard
More than 90% of wallboard mold cases trace back to a specific, fixable moisture source. Identifying yours is the critical first step in any successful remediation.
Plumbing failures: Leaky pipes behind walls, failed wax rings under toilets, dripping supply lines to refrigerators or washing machines, and slow leaks at water heater connections
Roof and exterior leaks: Storm damage, missing shingles, failed flashing around chimneys or vents, and compromised window or door seals
Condensation: Uninsulated cold-water pipes sweating in humid conditions, poorly insulated exterior walls, and HVAC systems operating at extreme temperatures
Bathroom moisture: Inadequate exhaust ventilation allowing shower steam to condense on walls, especially on exterior-facing bathroom walls
Seasonal issues: Ice dams in northern climates (typically January–March) causing water to back up under roof shingles and leak into attic spaces and wall cavities
High indoor humidity: Relative humidity consistently above 60%, particularly common in tight, energy-efficient homes built after the mid-2000s with limited natural air circulation
Past flooding events: River overflow, hurricane storm surge, or burst pipes that saturated wallboard—if the material wasn’t cut out and dried within 24–48 hours, mold growth is virtually guaranteed
Health and Structural Risks of Moldy Wallboard
Not every mold species produces dangerous mycotoxins, but any chronic mold growth indoors creates problems. The “black mold” (Stachybotrys chartarum) that receives the most media attention is just one of many species that can pose health risks to occupants.
Respiratory symptoms: Chronic coughing, nasal congestion, asthma flare-ups, and recurring sinus infections are commonly reported in homes with significant mold problems. Children, older adults, and those with pre-existing respiratory conditions are particularly vulnerable.
General discomfort: Headaches, fatigue, and irritated eyes are frequent complaints from people living in moldy environments. These symptoms often improve when occupants spend time away from the affected building.
Structural damage: Mold breaks down the paper facing on wallboard, causing the material to soften, crumble, or sag. Left unchecked, growth can spread to wood studs, baseboards, and other building components. Severe cases can compromise structural integrity and lead to repair costs exceeding $10,000.
Property value impact: Extensive, untreated mold damage frequently affects home appraisals and buyer inspections. Many real estate transactions require documented professional remediation with clearance testing before closing.
For anyone experiencing severe allergies, difficulty breathing, or persistent respiratory symptoms that ease when away from home, professional assessment becomes especially important.
How to Tell If Mold Is on or Inside Your Wallboard
Early detection dramatically reduces repair costs and health exposure. The challenge is that wallboard mold doesn’t always announce itself with obvious black patches—sometimes the only clue is a persistent musty smell or symptoms that won’t go away.
Understanding the difference between surface mold on wallboard and hidden mold inside wall cavities helps you decide on next steps.
Surface mold appears on the painted or wallpapered face of the wallboard. It’s often cleanable if the board itself remains structurally sound.
Hidden mold grows inside the wall cavity, on the back of the wallboard, or on framing members. It may not become visible until damage is significant.
The inspection methods below are preliminary assessments. If you suspect mold in a large area or can’t locate the source of a musty odor, professional testing may be warranted.
Surface Signs of Mold on Wallboard
When spotting mold on wallboard surfaces, here’s what to look for:
Growth patterns: Mold on drywall typically appears as irregular clusters of dots or smears rather than uniform solid staining. The pattern often follows moisture migration paths.
Color variations: Common colors include black, dark green, gray, brown, and occasionally white or yellow patches. Color alone doesn’t indicate toxicity—species identification requires laboratory testing.
Texture changes: Fuzzy, velvety, or slimy spots are classic indicators. You may also notice peeling paint, blistered wallpaper, or areas where finishes have detached in defined patches.
Water marks: Brownish tide marks or ring-shaped stains (for example, 6–12 inches up from the floor after a basement water intrusion) indicate past saturation and probable mold development.
Soft spots: Areas that dent easily with finger pressure signal both water damage and likely internal mold growth. Healthy wallboard feels solid and resists gentle pressure.
Smells, Symptoms, and Other Clues of Hidden Wallboard Mold
Hidden mold inside walls rarely shows fully on the surface until damage is well advanced. Pay attention to these less obvious indicators:
Persistent odors: A musty smell or earthy, stale scent strongest near baseboards, electrical outlets, or room corners often points to hidden mold. The musty odor may intensify during humid weather.
Health patterns: Recurring mold allergies or allergy-like symptoms—congestion, sneezing, irritated eyes—that ease when occupants spend time away from the building suggest an indoor source.
Auditory clues: Faint crackling, popping, or peeling sounds inside walls after heavy rain can indicate ongoing wetting and drying cycles that support mold growth.
Visual deterioration: Wallpaper that detaches along seams, paint that bubbles or flakes in vertical strips along stud locations, and baseboards that warp or separate from walls all suggest moisture problems.
Moisture readings: An inexpensive pin-type or pinless moisture meter can scan suspect walls non-destructively. Readings above approximately 16–18% moisture content in wallboard warrant further investigation—healthy wallboard typically reads below 12%.
Safety Precautions Before Disturbing Moldy Wallboard
Cutting, scrubbing, or demolishing moldy wallboard releases massive quantities of mold spores into the air. A single square foot of heavily colonized material can contain millions of spores, and disturbing it without proper protection creates significant mold exposure for anyone in the area.
National guidance from the EPA and CDC recommends caution for any DIY work and often suggests professional help for affected areas greater than about 10 square feet. The following precautions apply to smaller projects that homeowners choose to tackle themselves.
Three safety priorities before starting work:
Personal protective equipment (PPE) appropriate for mold work
Isolating the work area from the rest of the home
Shutting down utilities in affected walls to prevent accidents
People with asthma, severe allergies, pregnancy, or weakened immune systems should not participate in DIY mold removal. The risks of mold exposure during remediation outweigh the cost savings.
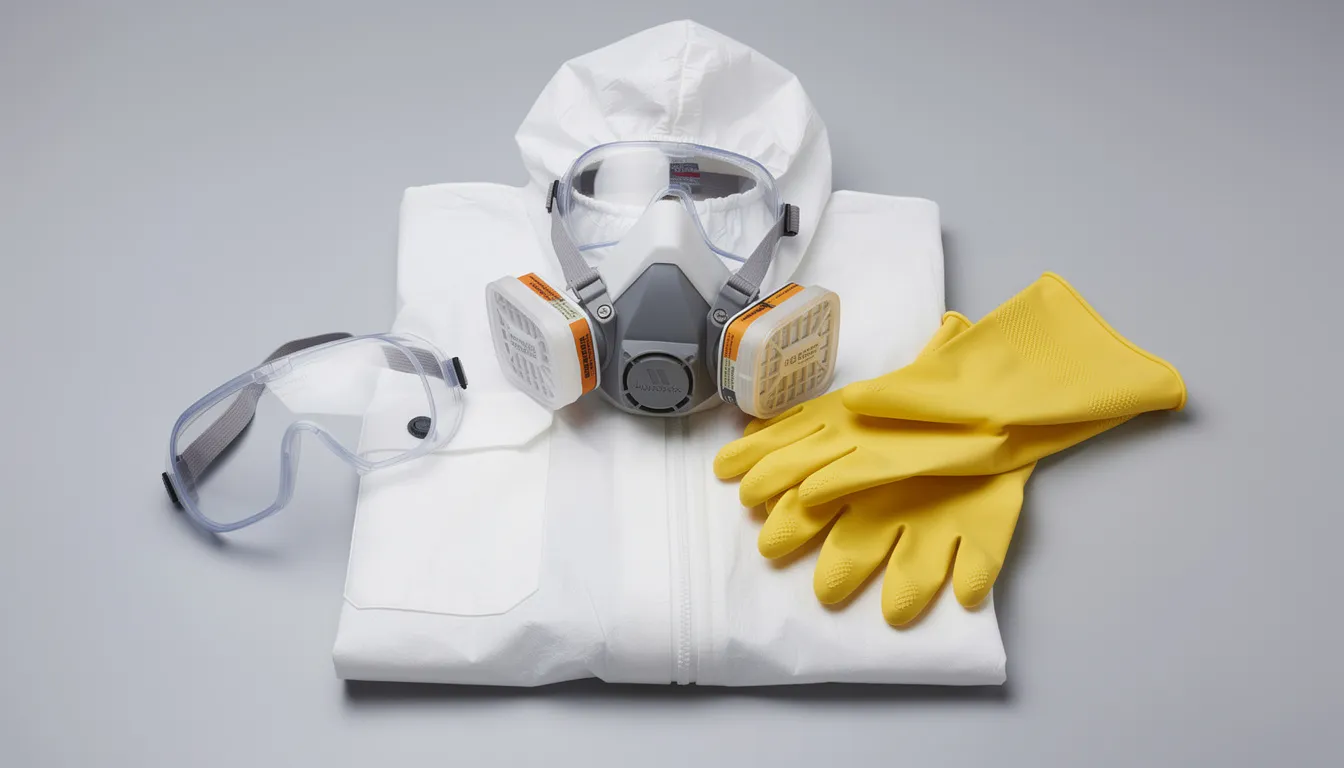
Personal Protective Equipment (PPE) for Working Around Mold
Minimum respirator: A NIOSH-approved N95 or better respirator is essential. P100 respirators provide even better filtration for demolition work. Standard dust masks are insufficient.
Eye protection: Non-vented safety goggles that seal against the face—not regular safety glasses—prevent spores from contacting eyes.
Hand protection: Nitrile or rubber disposable gloves extending to mid-forearm. Change gloves if they become torn or heavily contaminated.
Body coverage: Long-sleeved shirts and pants that can be washed in hot water immediately after work, or disposable coveralls for more extensive projects. Boot covers prevent tracking contamination through the house.
Fit matters: Facial hair significantly reduces respirator effectiveness. Perform a simple fit-check by covering the respirator and inhaling—you should feel it pull slightly against your face with no air leaks around the edges.
Post-work protocol: Change and bag contaminated clothing immediately after finishing. Shower to remove spores from skin and hair before sitting on furniture or entering other rooms.
Containing the Work Area and Protecting the Rest of the Home
Spores can travel through the home via air currents and HVAC systems if the work area isn’t properly sealed. Containment doesn’t need to be elaborate, but it does need to be thorough.
Seal doorways and openings: Close doors to the work area and cover them with 2–4 mil plastic sheeting, securing all edges with painter’s tape or duct tape. Create a floor-to-ceiling barrier.
Close HVAC penetrations: Seal supply and return vents, light fixtures, and any large cracks or gaps with plastic and tape before beginning demolition work.
Protect floors: Lay plastic or heavy drop cloths extending 3–6 feet around the affected wall to catch debris. This also simplifies cleanup.
Create negative pressure when possible: Position a box fan in a window to exhaust air outside, gently pulling air away from the rest of the house. Avoid blowing directly on moldy materials, which disperses spores.
Document your setup: Photographs or a simple sketch of your containment arrangement can be useful if insurance claims are filed later.
Utility and Safety Checks Before Cutting Wallboard
Electrical wiring and plumbing typically run vertically or horizontally along studs behind wallboard. Before making any cuts, protect yourself from shocks, bursts, and structural surprises.
Shut off electrical circuits: Switch off breakers to all circuits in the affected wall area. Use a plugin tester to verify outlets are dead before sawing or drilling.
Close water supplies: Shut off supply valves to any plumbing lines that may run through the suspect wall (for example, the cold-water shutoff to an upstairs bathroom if that wall shows mold damage).
Map the wall cavity: Use a stud finder with live-wire detection capability to locate studs, wires, and pipes before cutting inspection openings. Mark locations clearly on the wall surface.
Watch for structural concerns: Any signs of structural movement—bowed walls, sagging ceilings, rotted sill plates, or significant deflection when you push on the wall—are triggers to stop work and consult a structural engineer or professional remediation contractor.
DIY Steps to Remove Mold from Wallboard (Small, Manageable Areas)
This section covers clearly defined mold patches under approximately 10 square feet where the wallboard remains structurally sound. If you’re dealing with larger areas, multiple rooms, or wallboard that’s soft, crumbling, or badly water-damaged, professional mold remediation is the safer choice.
Key distinctions:
Shiny, intact latex paint over wallboard can sometimes be cleaned if the underlying board is solid
Soft, crumbling, or unpainted moldy drywall usually must be removed and replaced
Porous materials like carpet, cardboard boxes, and fiberboard baseboards in contact with moldy wallboard typically require removal as well
The process breaks into three phases: assess and isolate, clean or cut out the affected drywall, then dry thoroughly and reconstruct.
Cleaning Light Surface Mold on Painted Wallboard
For minor surface mold where the wallboard and paint remain intact:
Lightly mist the moldy area with your cleaning solution to prevent dry spores from becoming airborne
Gently wipe or scrub with a sponge or brush, working from the outer edges toward the center
Rinse with a damp cloth if using a product that requires it
Dry thoroughly with clean cloths and maintain air circulation in the room
Acceptable cleaning solutions for light surface mold:
Detergent and water (a few drops of dish soap per quart)
Diluted household disinfectant following label instructions
Hydrogen peroxide at 3% concentration
Commercial mold cleaners applied per manufacturer directions
Critical guidance:
Do not saturate the wallboard. Use a light spray and damp cloth rather than pouring solution directly on the wall. Over-wetting wallboard can make mold damage worse.
Baking soda mixed with water creates a mild abrasive paste useful for stubborn spots on hard surfaces.
Discard heavily contaminated sponges and rags in sealed plastic bags. Never reuse them elsewhere.
Run a dehumidifier or fans (not blowing directly on remaining mold) for 24–48 hours to return wall moisture to normal levels.
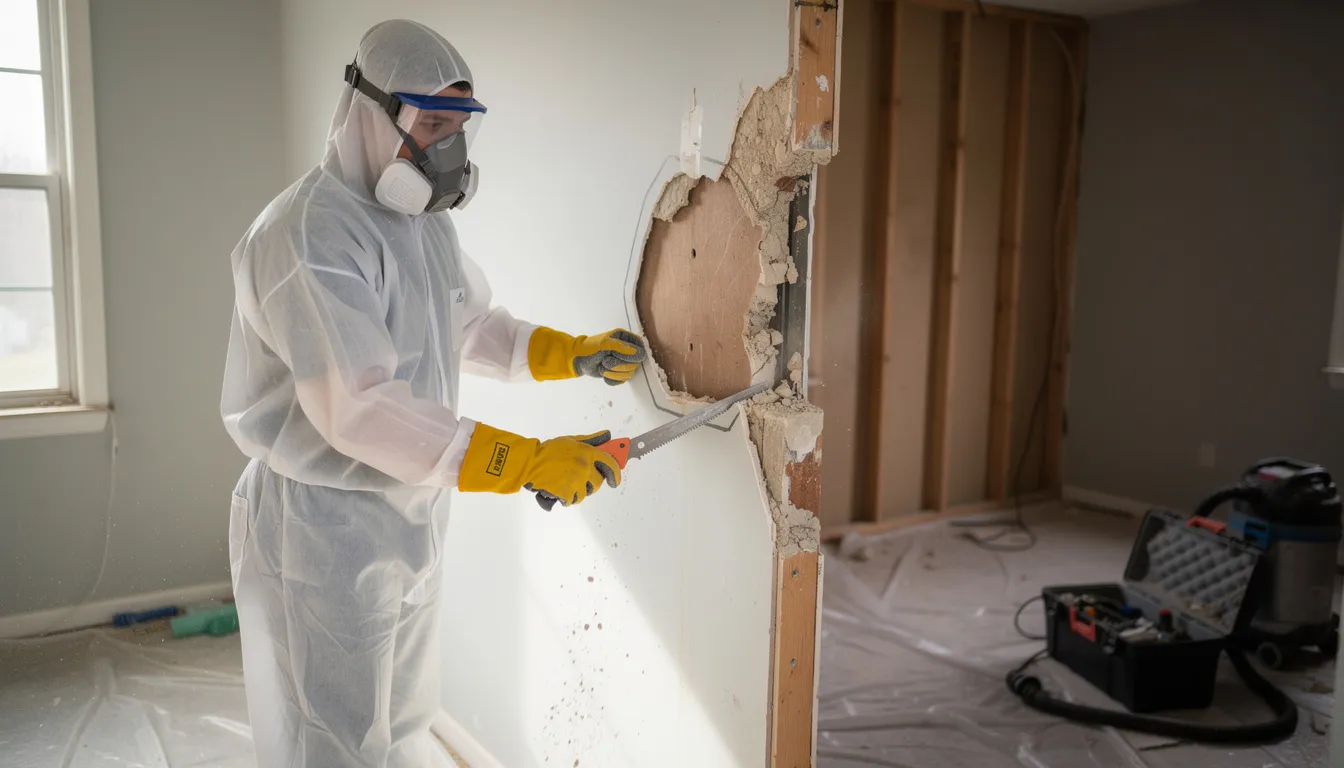
Removing and Replacing Mold-Damaged or Unpainted Wallboard
Once the paper facing is peeling, bubbling, or the gypsum core is soft or crumbling, that section needs to be cut out and replaced. You cannot kill mold and paint over structurally damaged wallboard—the problem will return.
Step-by-step process:
Mark your cut lines: Draw a rectangle extending 12–24 inches beyond the last visible mold or soft spot. Position cuts at mid-stud when possible to simplify patching with new drywall.
Score and cut: Use a utility knife to score the wallboard along your lines, then cut through with a drywall saw. Work carefully to avoid cutting into wires or pipes.
Remove sections directly into bags: Lift out wallboard sections and immediately place them in heavy-duty contractor bags. Minimize handling that disperses spores.
Address insulation: Any wet or moldy insulation behind the wallboard should be removed and bagged separately. Fiberglass batts and cellulose insulation cannot be effectively cleaned.
HEPA vacuum the cavity: Using a shop vacuum with a HEPA filter, vacuum the open wall cavity, studs, plates, and surrounding surfaces to capture residual mold dust. Work from top to bottom.
Treat visible mold on framing: Apply an appropriate cleaner or antimicrobial product to any mold visible on wood studs or sheathing. Allow surfaces to dry completely.
Verify dryness: Use a moisture meter to confirm the wall cavity has dried before installing new materials. Wood moisture content should be below 15%.
Install new drywall (preferably mold resistant drywall in high-risk locations) only after confirming the moisture source is fixed and cavity moisture readings are acceptable.
Treating Wall Cavities, Framing, and Other Hard Surfaces
Simply replacing wallboard without addressing the exposed cavity and framing allows mold to return. Spores remain on studs, plates, and sheathing unless properly cleaned.
Three essential tasks:
Remove all residual debris from the cavity
Clean contaminated hard surfaces thoroughly
Optionally apply a mold-resistant coating for additional protection
If you find severely rotted studs or plates—wood that’s crumbly, deeply pitted, or shows significant structural deterioration—stop and consult a qualified contractor. Compromised framing creates safety risks and may require sistering or replacement.
Cleaning and Drying Framing Around Moldy Wallboard
First HEPA vacuum pass: Vacuum all accessible wood framing, backs of sheathing, and nearby surfaces to remove loose spores and debris.
Scrub stained wood: Using a stiff brush and an approved cleaning solution (detergent and water works for light contamination; antimicrobial products for heavier growth), scrub stained or lightly moldy wood. Wipe away residue as you work.
Second HEPA vacuum pass: After scrubbing, vacuum again to capture loosened spores before they settle elsewhere.
Dry thoroughly: Run dehumidifiers and fans to reduce wood moisture content below approximately 15% before closing the cavity. This may take several days depending on conditions. Use a moisture meter to verify.
Inspect carefully: Check all framing members, electrical boxes, and any HVAC components in the cavity for signs of mold. Contaminated ducts may require separate cleaning.
Encapsulating Residual Mold Staining (When Appropriate)
Even after thorough cleaning, faint staining may remain on wood surfaces. Mold encapsulant coatings can lock remaining spores in place and provide ongoing protection—but only when applied correctly.
Encapsulation is a final step, not a shortcut: It’s not a substitute for removing obviously moldy or wet wallboard and insulation. Use it only on cleaned, dry surfaces where lingering moisture has been eliminated.
Apply fungicidal mold encapsulant properly: Follow manufacturer instructions for spread rate and drying time. Coverage is typically 200–400 square feet per gallon depending on surface porosity.
Multiple coats for heavy staining: Apply at least two coats on heavily stained areas, allowing full cure between applications. Some products specify 24-hour minimum between coats.
Moisture control comes first: Encapsulating damp wood or wallboard traps moisture and creates conditions for future mold growth. Verify materials are dry before sealing.
DIY vs. Professional Mold Remediation on Wallboard
The decision between handling mold damage yourself and hiring professionals depends on several factors: the size of the affected area, accessibility, health considerations for household members, insurance requirements, and your comfort level with demolition and reconstruction work.
The 10 square foot guideline: The EPA suggests homeowners can address mold areas up to about 10 square feet. Larger or multi-room infestations typically warrant professional crews with industrial equipment.
Hidden growth changes the calculation: If you can see mold in one location but suspect more mold inside walls based on odors or moisture readings, professional assessment may reveal problems beyond DIY scope.
Transaction requirements: Real estate sales, rental turnover, and insurance claims often require documented professional remediation with clearance testing and written reports.
Local regulations vary: Some states and municipalities require licensed mold contractors above certain project sizes. Check your local requirements before starting work.
When a Moldy Wallboard Problem Is a Reasonable DIY Project
A typical DIY-suitable case might look like this: a 2–3 square foot patch of mold on a bathroom wall outside the shower area. The paint remains intact, the wallboard feels solid, and you’ve identified the moisture source (perhaps splash water from a missing caulk line) and corrected it.
Good candidates for DIY remediation:
No strong, widespread musty odor beyond the immediate moldy area
No visible mold in multiple rooms or on multiple floors
No household members with severe mold allergies, asthma, or compromised immune systems
Homeowner has basic tools: utility knife, moisture meter, shop vac with HEPA filter, proper safety measures including PPE
Ability to safely handle minor drywall replacement and finishing
Document your work with photographs before, during, and after—including repairs to the moisture source. This documentation may prove valuable for future reference or property transactions.
Signs You Should Call in Professional Mold Remediation
Contact a professional mold remediation company when you encounter:
Scale: Visible mold patches larger than about 3 feet by 3 feet, multiple walls affected, or growth on more than one floor
Complexity: Mold behind tiled shower walls, inside exterior walls with insulation, around HVAC ducts, or in crawl spaces with limited access
Recurrence: Mold growth returning after previous cleaning attempts, indicating an unresolved moisture source or incomplete remediation process
Health concerns: Household members experiencing allergic reactions, asthma attacks, chronic bronchitis, or other serious symptoms potentially linked to mold exposure
Transaction requirements: Real estate sales where lenders or buyers request proof of professional remediation with clearance documentation
Professional crews bring specialized equipment unavailable to most homeowners:
Equipment | Purpose |
|---|---|
Negative air machines | Create pressure differentials to contain spores |
Commercial dehumidifiers | Remove moisture faster than consumer units |
Infrared cameras | Locate hidden moisture behind intact surfaces |
HEPA air scrubbers | Filter airborne spores during demolition |
Moisture mapping tools | Document moisture extent for insurance |
Post-remediation testing | Verify spore counts return to acceptable levels |
Costs for professional mold remediation typically range from $500 for very minor issues to $6,000 or more for extensive damage. Stachybotrys (black mold) sites often cost 2–3 times more due to additional safety protocols.
Preventing Mold from Returning on New or Existing Wallboard
Successful mold remediation doesn’t end when you install new drywall and apply fresh paint. Long-term prevention requires ongoing attention to moisture and humidity control. Without addressing root causes, you’ll be facing the same problem again—often within months.
Three pillars of prevention:
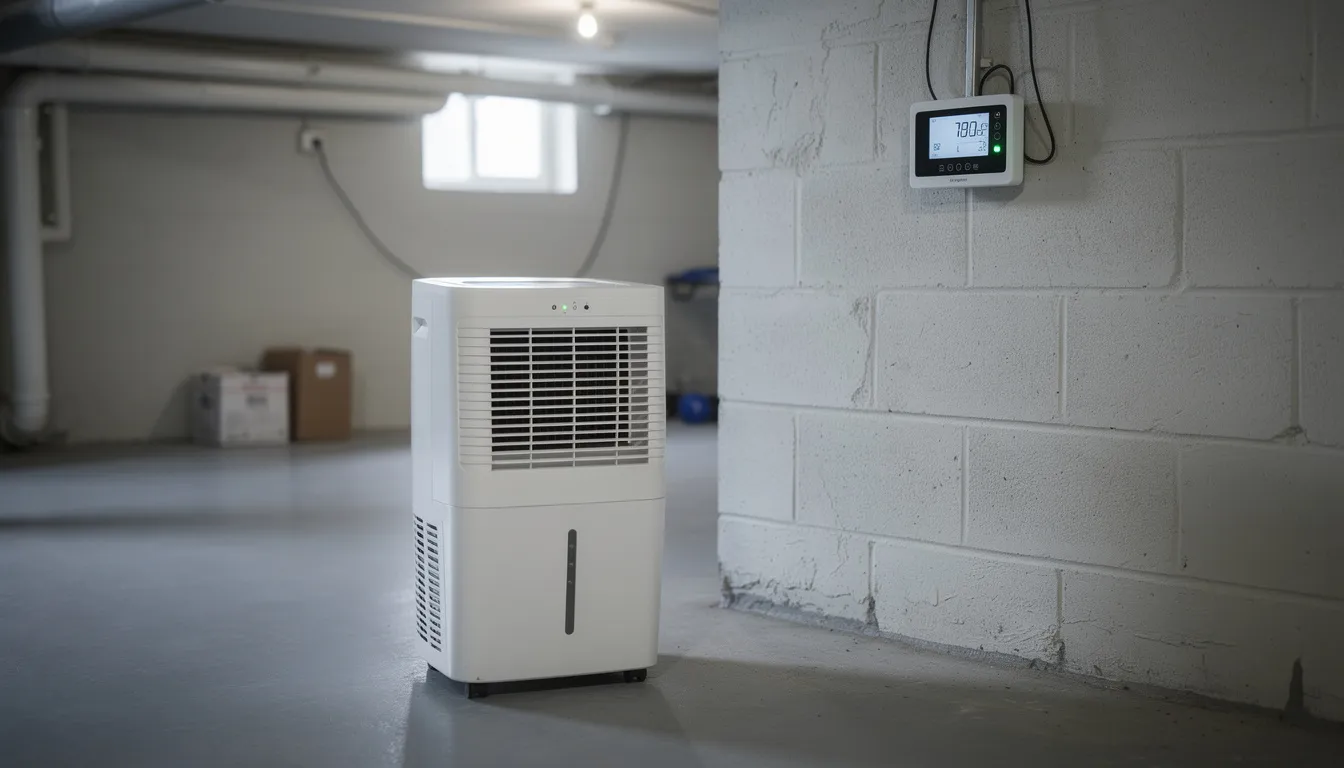
Keep relative humidity in the 30–50% range throughout the home
Repair leaks and moisture intrusions quickly—within 24–48 hours when possible
Ensure good air circulation in moisture-prone rooms like bathrooms, kitchens, and laundry areas
Moisture and Humidity Control Strategies
Monitor humidity regularly: Place inexpensive digital hygrometers in basements, bathrooms, and laundry rooms. Check readings at least weekly and note seasonal patterns.
Upgrade exhaust fans: Install or upgrade exhaust fans in bathrooms and kitchens to vent directly outdoors (not into attics). Run fans for 20–30 minutes after showers or cooking. Poor ventilation is a leading cause of chronic wallboard mold.
Fix leaks immediately: Address roof leaks, plumbing drips, and window or door flashing failures within 24–48 hours of discovery. The longer materials stay wet, the more likely mold becomes.
Seasonal maintenance: Clean gutters in spring and fall. Verify downspouts discharge at least 3–4 feet from foundation walls. Grade soil away from the house to minimize wall wetting.
Run dehumidifiers in problem areas: Set units to maintain 45–50% RH in chronically damp basements or crawl spaces. Use hose-to-drain setups when possible to avoid daily tank emptying.
Improve air circulation: Keep interior doors open when practical. Use ceiling fans or portable fans to move air in rooms that tend toward high humidity.
Building and Finishing Choices That Resist Wallboard Mold
When replacing moldy drywall or building new, material choices matter:
Mold-resistant wallboard: Products with treated paper or fiberglass facings significantly resist mold growth compared to standard paper-faced boards. Use these in bathrooms, utility rooms, below-grade walls, and any area with past water damage. Industry claims suggest 80–90% better mold resistance than standard products.
Mold resistant primer and paint: Apply mold-inhibiting primer before painting in bathrooms and kitchens. Look for interior paints labeled for moisture or mildew resistance. Some products include antimicrobial additives that discourage future growth.
Avoid vinyl wallpaper on exterior walls: In humid climates, vinyl wallpaper traps moisture against wallboard surfaces. Use breathable wall coverings or paint instead.
Design for accessibility: Open shelving below sinks, removable baseboard designs, and accessible access panels near plumbing make future inspections and repairs faster and less destructive.
Sand smooth and apply skim coat properly: When patching, apply joint compound in thin layers, allowing each to dry completely. Sand the surface completely between coats to prevent moisture-trapping voids.
Frequently Asked Questions About Mold on Wallboard
This section addresses common homeowner concerns based on real-world mold cases involving wallboard and drywall.
How Fast Can Mold Grow on Wet Wallboard?
Mold can begin to colonize within 24–48 hours on damp paper-faced wallboard under favorable conditions (warm temperatures, relative humidity above 60%). Visible mold growth typically appears within 7–21 days depending on temperature, humidity levels, and the extent of saturation.
Any wallboard soaked for more than 24–48 hours by a leak or flood should be considered high-risk. Prompt drying or removal is essential to prevent mold from establishing inside the material.
Should I Use Bleach on Moldy Wallboard?
Bleach can discolor mold and kill surface mold on hard surfaces, but it’s not ideal for porous materials like wallboard. The chlorine doesn’t penetrate deeply into the gypsum core, and the water content can actually add moisture to already-damp materials.
For light surface mold on intact painted wallboard, detergent-based cleaners or specialized mold products are more appropriate. For damaged, soft, or unpainted wallboard, the solution is removal and replacement rather than cleaning. You cannot simply apply a bleach solution and expect to solve a structural mold damage problem.
Do I Need Mold Testing If I Can Already See Mold on the Wallboard?
In most cases, visible mold plus a clear moisture source doesn’t require laboratory testing. You already know you have a problem, and the priority becomes safe removal and moisture control rather than species identification.
Testing may be helpful in complex situations: when mold covers a large area and you need documentation for insurance, when occupants are experiencing severe health symptoms and want to identify specific species, or when legal disputes arise between tenants and landlords. The CDC notes that all molds should be treated similarly for remediation purposes regardless of species.
Will Homeowners Insurance Pay to Fix Moldy Wallboard?
Coverage varies widely by policy and insurer. Many policies cover mold damage resulting from sudden, accidental events—a water heater burst on a specific date, a washing machine supply line failure, or a pipe that froze and broke during a winter storm.
However, mold resulting from long-term neglect, gradual leaks, or chronic high humidity is frequently excluded. Document conditions with dated photographs, keep all receipts for repairs and remediation, and contact your insurer promptly if a recent leak or event caused the damage. Ask specifically about mold coverage limits, as many policies cap mold-related claims.
Is It Safe to Live in a Home While Moldy Wallboard Is Being Removed?
For smaller, well-contained projects in a single room, many homeowners remain in the building but stay out of the work zone during active remediation. Children, older adults, and anyone with respiratory conditions or mold allergies should avoid the affected area entirely.
Larger multi-room remediations, whole-floor projects, or work releasing heavy dust often require temporary relocation. Professional contractors typically advise on displacement needs based on project scope. Return to the space after work is complete, containment is removed, air has been filtered, and—for professional jobs—clearance testing confirms spore counts have returned to acceptable levels.
Key Takeaways
Successfully addressing mold on wallboard comes down to a few core principles:
Priority | Action |
|---|---|
Speed | Address within 24–48 hours of discovery |
Source | Find and fix the moisture problem first |
Safety | Use proper safety measures and PPE |
Scope | DIY under 10 sq ft; call pros for larger jobs |
Prevention | Maintain 30–50% humidity, fix leaks fast |
Mold mold issues aren’t inevitable consequences of home ownership—they’re signals that moisture has found a way in. Whether you tackle removal yourself or call in professionals, the real success comes from understanding why mold appeared in the first place and taking steps to ensure it doesn’t return.
Check your home’s humidity levels this week. Inspect areas around plumbing, exterior walls, and anywhere you’ve noticed water stains in the past. Address small problems before they become expensive ones.
Latest news


