Water mitigation: what it is, how it work, and when you need it

Water Mitigation: What It Is, How It Works, and When You Need It
When water invades your home—whether from a burst pipe in the dead of winter or a summer storm that overwhelms your drainage system—every minute counts. Water mitigation is the emergency response that can mean the difference between a manageable cleanup and a catastrophic loss. This guide breaks down exactly what water mitigation involves, how it differs from restoration, and when you need professional help.
What Is Water Mitigation?
Water mitigation refers to the immediate actions taken in the first hours after a water leak, flood, or other water intrusion event to minimize damage and prevent further destruction. The process focuses on stopping the water source, extracting standing water, and stabilizing the structure before secondary damage like mold growth can take hold.
Understanding water mitigation starts with recognizing what it is not: it’s not about full repairs, cosmetic fixes, or returning your property to its pre-loss condition. Mitigation is purely about limiting the spread and severity of damage during the critical first 24 to 72 hours.
Here’s what defines water mitigation at its core:
Emergency-focused: Mitigation begins within hours of water damage occurring, often before restoration services are even discussed
Damage limitation: The goal is minimizing damage, not completing repairs
Time-sensitive: Professionals typically aim to begin the mitigation process within the first 24 hours to prevent mold, structural decay, and escalating costs
Standards-driven: Certified water damage professionals follow industry guidelines like IICRC protocols to ensure proper execution
Real-world examples of when mitigation is needed:
A frozen pipe bursts in a two-story home during a January cold snap, sending water cascading through ceilings and walls—the mitigation team arrives to shut off the water main, extract water removal equipment, and begin emergency drying
A severe thunderstorm in July overwhelms your home’s drainage, leaving you with a flooded basement containing six inches of surface water—professionals respond to pump out excess water and deploy commercial grade equipment to dry affected areas
Water Mitigation vs. Water Restoration
Many homeowners use “mitigation” and “restoration” interchangeably, but they represent two distinct phases of recovering from water damage. Understanding the difference helps you know what to expect—and what questions to ask—when dealing with water damage cleanup.
Water mitigation is the emergency phase. It includes stopping water intrusion, extracting standing water, protecting structural components from further damage, and preventing secondary damage like mold and bacterial growth. This phase typically occurs within the first 24 to 72 hours.
Water restoration is the follow-up phase. The water damage restoration process involves repairs, reconstruction, replacement of damaged materials, and cosmetic finishing to return your property to its pre-loss condition. This phase can take days or weeks depending on the severity.
Key differences at a glance:
Timing: Mitigation happens in the first 24–72 hours; restoration unfolds over days or weeks
Scope: Mitigation stabilizes the environment; restoration rebuilds it
Typical tasks in mitigation: Water extraction, removing standing water, emergency drying, removing unsalvageable materials
Typical tasks in restoration: Replacing damaged walls, installing new flooring, repainting, replacing damaged items
Example scenario showing both phases:
A second-floor supply line bursts while you’re at work. You come home to water dripping through your first-floor ceiling.
Day 1-2 (Mitigation): The water mitigation company arrives, shuts off the water, extracts standing water from both floors, removes saturated drywall and insulation, and sets up air movers and dehumidifiers.
Weeks 1-3 (Restoration): The restoration company handles the restoration process—installing new drywall, refinishing hardwood floors, replacing baseboards, and repainting affected rooms.
Most professional water restoration companies can provide both mitigation and restoration services, but they often bill them separately. This matters for your insurance claim, as mitigation costs are typically documented and approved before restoration work begins.
What Does Water Mitigation Include?
Water mitigation follows a structured, step-by-step process that begins as soon as the property is safe to enter. While every water damage situation is different, the core components remain consistent across most residential and commercial losses.
Major components of the water mitigation process:
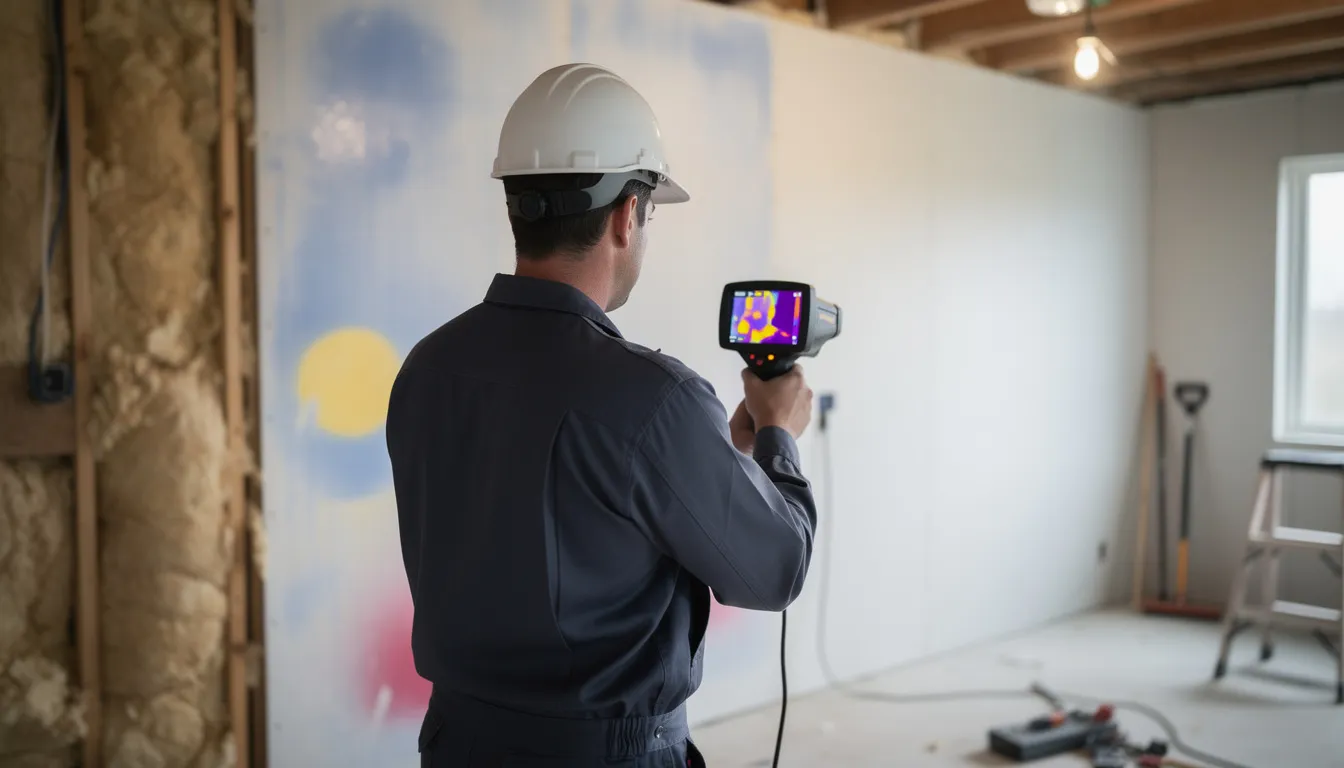
Inspection and moisture mapping: Technicians use moisture meters, infrared cameras, and visual inspection to identify all affected areas, including hidden moisture behind walls and under flooring
Stopping the water source: Whether it’s a leaky roof, a burst pipe, or a failed sump pump, the first active step is eliminating the source of water intrusion
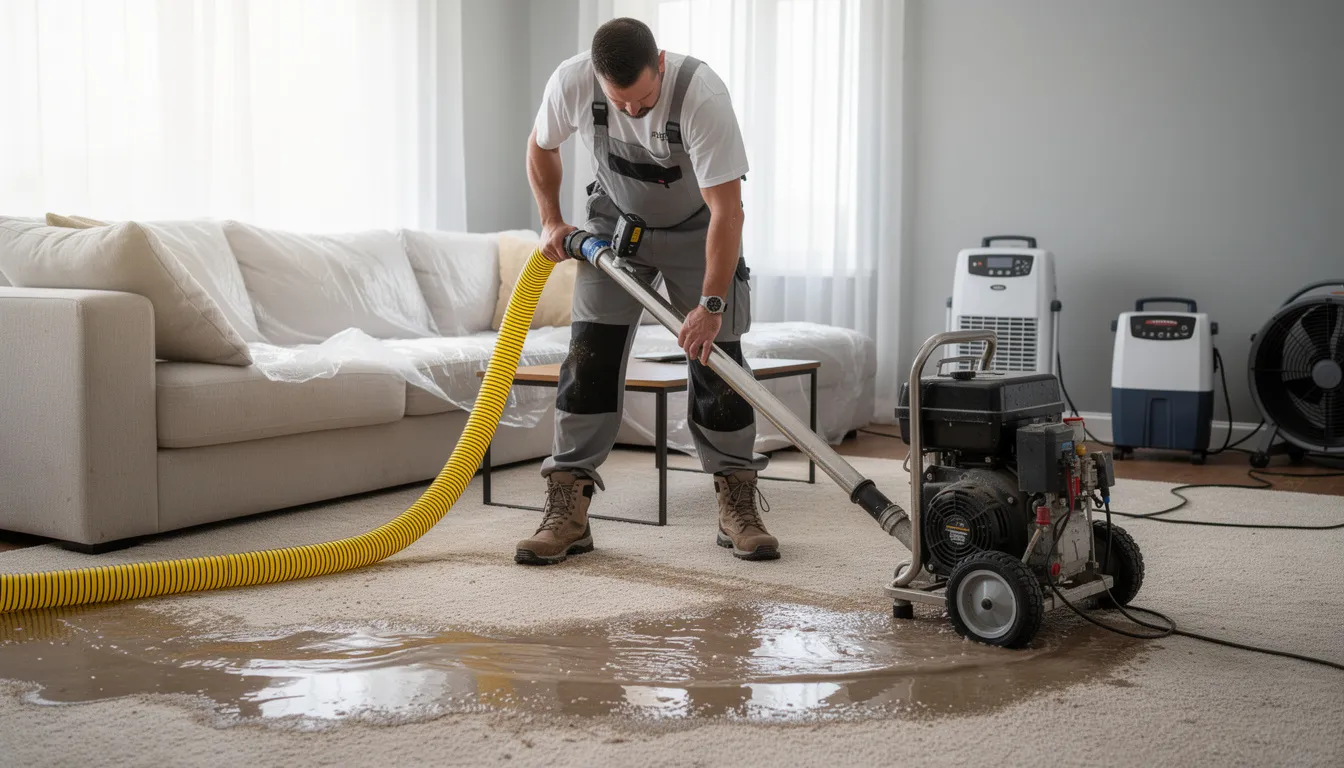
Water extraction: Industrial extractors and submersible pumps remove excess water from floors, carpets, and structural cavities—removing water in liquid form is approximately 500 times more efficient than trying to evaporate it
Removal of unsalvageable materials: Saturated drywall, swollen particle-board cabinets, and delaminated carpet that cannot be effectively dried are removed to prevent mold and enable proper drying
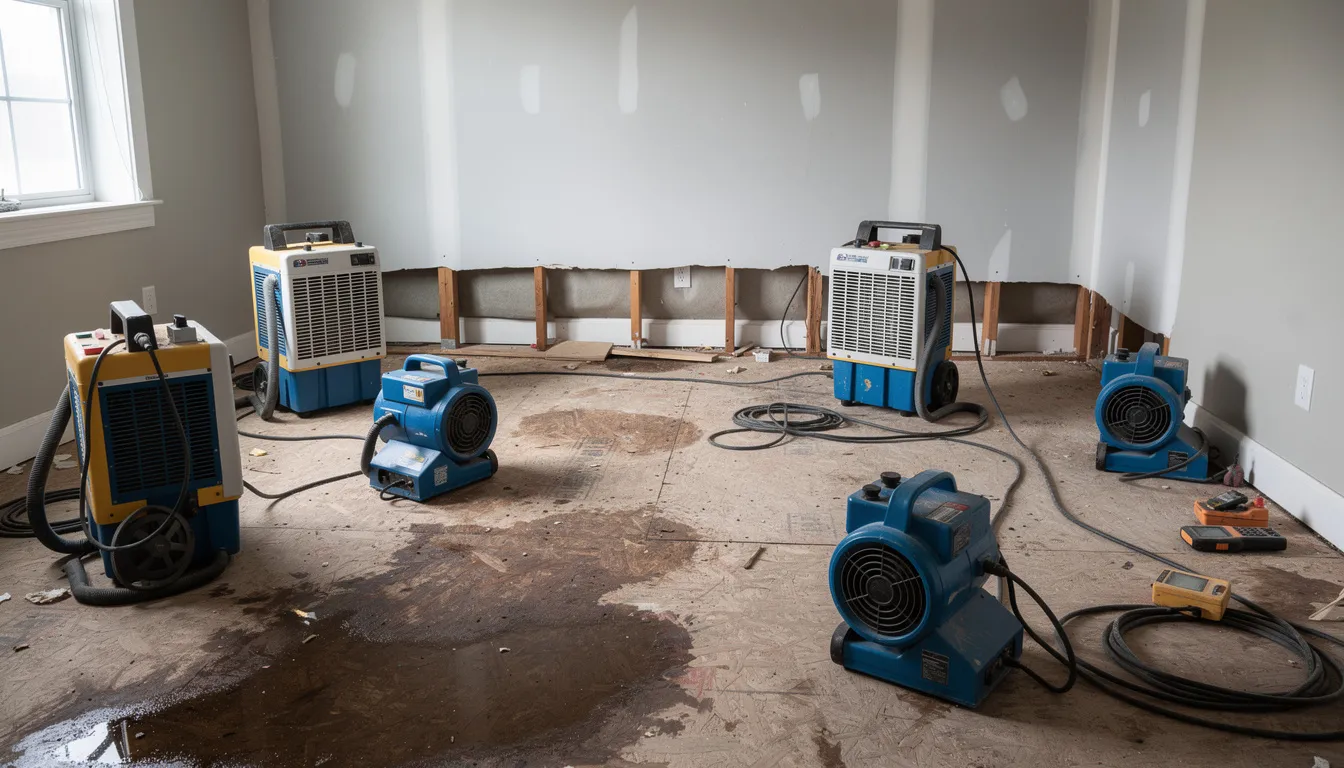
Drying and dehumidification: Air movers, dehumidifiers, and temperature control work together to eliminate moisture from materials and the air itself—optimal temperatures between 70-90°F promote effective evaporation
Cleaning and disinfection: Especially critical when water comes from contaminated sources (sewage backups, storm water, or overflowing toilets with waste), sanitization protects occupants from health risks
Temporary protective measures: Tarping a damaged roof, boarding windows, or sealing openings to prevent additional water intrusion during the drying process
Equipment commonly used:
Truck-mounted or portable extractors
Submersible pumps for flooded basement situations
Air movers (high-velocity fans)
Commercial dehumidifiers
Moisture meters for daily readings
Infrared cameras to detect hidden moisture
Material-specific treatment:
Different materials require different approaches. Technicians evaluate drywall, insulation, carpet, pad, hardwood flooring, and cabinetry based on saturation level and contamination category. Some materials can be dried in place, while others must be removed entirely.
Contents may be moved, elevated on blocks, or taken off-site for specialized drying if needed. However, full content restoration typically falls under the later restoration phase rather than emergency mitigation.
Typical Water Mitigation Steps (Day 1–3)
Here’s a chronological breakdown of what happens during the first 72 hours of a standard residential water damage event:
Step 1: Initial Safety Check and Inspection (Hours 0-4)
Shut off power to affected areas if electrical hazards exist
Check for structural hazards (sagging ceilings, buckled floors)
Document damage with time-stamped photos and detailed notes
Identify the water source and contamination category
Step 2: Stop the Water Source (Hours 1-6)
Close the main water shutoff valve for pipe-related failures
Cap or temporarily repair broken pipes
Tarp a damaged roof after storm events (such as an April wind event causing roof damage)
Address any ongoing water intrusion before extraction begins
Step 3: Water Extraction (Hours 2-12)
Extract standing water from floors, carpets, and cavities
Focus special attention on basements and lower-level rooms where water naturally collects
Remove surface water using truck-mounted extractors and portable units
Continue extraction until no more liquid water can be removed
Step 4: Material Removal (Hours 6-24)
Remove or detach materials that cannot be effectively dried
Examples: swollen particle-board cabinets, delaminated carpet, saturated insulation behind walls
Cut drywall above the water line to expose wall cavities for drying
Document all removed materials for insurance purposes
Step 5: Drying Equipment Setup (Hours 12-72+)
Position air movers strategically to maximize airflow across wet surfaces
Set up dehumidifiers to capture moisture from the air
Take daily moisture meter readings to track the drying process
Reposition equipment as needed based on moisture levels
Adjust dehumidifier settings as the environment dries
Step 6: Cleaning and Antimicrobial Treatment (Hours 24-72)
Clean all affected surfaces
Apply antimicrobial treatments in areas with bacterial growth risk
Pay particular attention to warm, humid conditions that promote mold growth
Document cleaning procedures for insurance records
Categories and Classes of Water Damage
The restoration industry classifies water damage using a standardized system based on contamination level (Categories 1-3) and the extent of structural involvement (Classes 1-4). This classification determines how aggressive mitigation must be, which materials can be salvaged, and what protective equipment technicians need.
Water Contamination Categories
Category 1 (Clean Water)
Water from a sanitary source that poses no substantial risk
Examples: A fresh washing machine supply hose break, a new copper pipe failure behind a kitchen wall, water from a sink overflow with clean tap water
Materials wet with Category 1 water can often be dried in place if addressed quickly
Category 2 (Gray Water)
Water containing significant contamination that could cause illness if consumed
Examples: Dishwasher discharge line leak, overflowing washing machine with detergent and soil, aquarium leaks, water leak from a toilet bowl (urine only)
Requires more aggressive cleaning and may necessitate removal of porous materials
Category 3 (Black Water)
Highly contaminated water that contains pathogens and requires special handling
Examples: Sewage backups, river flooding after a natural disaster, groundwater intrusion after heavy rainfall, flood damage from storm surge
Most porous materials must be removed; technicians wear full protective equipment including rubber boots and respirators
Water Damage Classes
Class 1: Small area affected, minimal moisture absorption—such as a contained water leak in a tiled bathroom
Class 2: Larger affected areas with water wicking up walls less than 24 inches high; carpet and cushion are wet
Class 3: Water has come from overhead, saturating walls, insulation, carpet, and subfloor—often seen with severe water damage from a second-floor failure
Class 4: Specialty drying situations involving low-porosity materials like hardwood, stone, or concrete that hold moisture and require extended drying times
Understanding these classifications helps you grasp why two seemingly similar water events might require very different mitigation approaches and timelines.
When to Call a Water Mitigation Company
Time is the enemy when water damage occurs. Mold can begin developing within 24 to 48 hours, and structural materials weaken progressively the longer they remain saturated. Knowing when to call a professional can prevent mold growth and protect your home’s structural stability.
Call a water mitigation company immediately if you observe:
Standing water on floors that you cannot remove quickly with towels
Water dripping through ceilings from an unknown source
Soaked walls or ceilings after a storm or roof damage
Sewage odors or visible sewage backup
Water source that is unknown or inaccessible
Any water damage covering more than a small, contained area
Water that has been present for more than a few hours
Higher-risk properties that especially benefit from prompt professional response:
Homes with finished basements (more materials at risk, harder to dry)
Properties with hardwood floors (require specialized drying to prevent buckling)
Older homes with aging plumbing prone to gradual water damage
Households with vulnerable occupants (children, elderly, immunocompromised individuals)
Professional mitigators can detect hidden moisture behind baseboards and inside wall cavities using a moisture meter and infrared technology. This capability is crucial because what you can see is often just a fraction of the total water damage—and undetected moisture leads to mold growth weeks later.
Many reputable water restoration services offer 24/7 emergency response. They arrive with drying equipment ready to deploy and can coordinate with plumbers (for that burst pipe repair), roofers (for repairing roof damage), and other trades as needed.
Contact your insurance company as soon as possible after calling a mitigation company. This allows site documentation and coverage discussions to begin while mitigation is underway.
DIY vs. Professional Water Mitigation
Not every water incident requires professional remediation. However, many homeowners underestimate the complexity of proper water mitigation and end up with costly secondary damage.
When DIY might be acceptable:
A few gallons of clean water from a sink overflow, caught within an hour
A small, contained spill on tile or vinyl flooring
Water that hasn’t spread beyond a single room with no carpet
You can verify no water reached wall cavities, subfloors, or adjacent spaces
When to call professionals immediately:
Several inches of water on a basement floor (flooded basement scenario)
Any incident involving sewage, septic waste, or outdoor floodwater
Water that has been present for more than a few hours
Water from an unknown source that may still be active
Wet drywall, insulation, or carpet over significant surface area
Any situation involving electrical hazards
Risks of inadequate DIY mitigation:
Hidden moisture remains behind walls and under flooring, leading to gradual water damage
Electrical hazards in wet areas create safety risks
Improper disinfection of contaminated water leaves behind health risks
Under-sized household fans and dehumidifiers cannot achieve proper drying
Mold colonies establish before damage becomes visible
Health agencies warn that post-flood cleanup can be hazardous without proper training and protective gear. Contaminated water exposure can cause illness, and improper mold remediation can spread spores throughout the home.
Before attempting DIY water damage repair, honestly assess your skills, available time, safety knowledge, and equipment. Prioritizing health and structural integrity over short-term cost savings is almost always more cost effective in the long run.
Water Mitigation and Insurance
Understanding how water mitigation and restoration interact with your insurance coverage helps you navigate claims more effectively. Coverage depends heavily on your policy specifics and the cause of the damage.
General coverage principles:
Most homeowners insurance policies cover water mitigation when the loss is sudden and accidental
Covered events typically include: sudden pipe burst, appliance failure, storm-damaged roof that allows rain inside
Most policies exclude: long-term leaks, general wear-and-tear, deferred maintenance issues
Flood waters from overflowing rivers, lakes, or heavy surface runoff typically require a separate flood insurance policy
What to review in your policy:
Exclusions for gradual water damage (slow leaks that develop over time)
Mold coverage limits or sub-limits (many policies cap mold-related expenses)
Sewer backup endorsements (often required as an add-on for coverage)
Requirements about prompt mitigation to keep coverage valid
Whether water mitigation and restoration are performed separately for billing purposes
Documentation checklist for your insurance claim:
Time-stamped photos and videos of all damage before cleanup begins
Written timeline noting when the water leak or flood was discovered
Photos of the water source if identifiable
Saved receipts and invoices from all mitigation work
Daily moisture readings and drying logs from the mitigation company
Photos of materials before they are removed
Coordination recommendations:
Have the mitigation company provide a detailed scope of work to share with the adjuster
Request that moisture readings and equipment logs be documented thoroughly
Keep samples or photos of removed materials (damaged walls, flooring, baseboards) for the claim file
Ask your restoration company about their experience working with your insurance company
Working With Adjusters During Mitigation
The relationship between your mitigation team and insurance adjuster significantly impacts claim outcomes. Here’s what to expect and how to facilitate smooth communication:
Scope documentation: Allow the mitigation company to create a clear scope of emergency work (water extraction, drying affected areas, removal of unsalvageable materials) that can be shared with the adjuster
Material samples: When practical, keep samples or photographs of removed materials for the claim file—this helps if coverage questions arise later
Regular updates: Request daily or every-other-day updates from both your mitigation contractor and your adjuster to stay informed about progress and coverage expectations
Vendor selection: While your insurer may recommend or approve certain vendors, you typically have the right to select your own qualified water mitigation company
Separate authorizations: Understand that the adjuster may authorize mitigation costs before approving restoration work—these may cover damage caused by different aspects of the event
Common misconceptions: Don’t assume your adjuster will automatically approve everything; document thoroughly and communicate proactively
Practical Tips to Limit Water Damage Before Help Arrives
Safety comes first. Do not enter standing water if you suspect electrical hazards, structural instability, or contamination. If you’re unsure, wait for professionals.
If it’s safe to act, here’s what you can do to prevent further damage:
Shut off the main water supply if the water source is a pipe, appliance, or fixture
Turn off electricity to affected areas at the breaker panel—never touch electrical components while standing in water
Move dry valuables out of the affected area to prevent water damage
Stop the spread by placing towels at doorways to prevent water from reaching unaffected rooms
Simple mitigation actions while waiting for help:
Use towels or mops to remove small amounts of clean surface water
Place aluminum foil or wooden blocks under furniture legs to prevent staining and water absorption
Prop up wet cushions and pillows to promote airflow
Open interior doors and closets in affected areas to improve ventilation
If weather permits and no contamination exists, open windows to introduce fresh air
Critical warnings—do NOT:
Use household vacuums on standing water (risk of electrocution and equipment damage)
Turn on ceiling light fixtures in rooms with a wet ceiling
Walk through water that may be in contact with live electrical components
Use electrical appliances while standing on wet floors
Attempt to remove excess water with equipment not rated for water use
Cold climate considerations:
Avoid rapid temperature changes that could cause additional cracking or condensation
Don’t overheat the space suddenly—gradual warming is safer for water-damaged materials
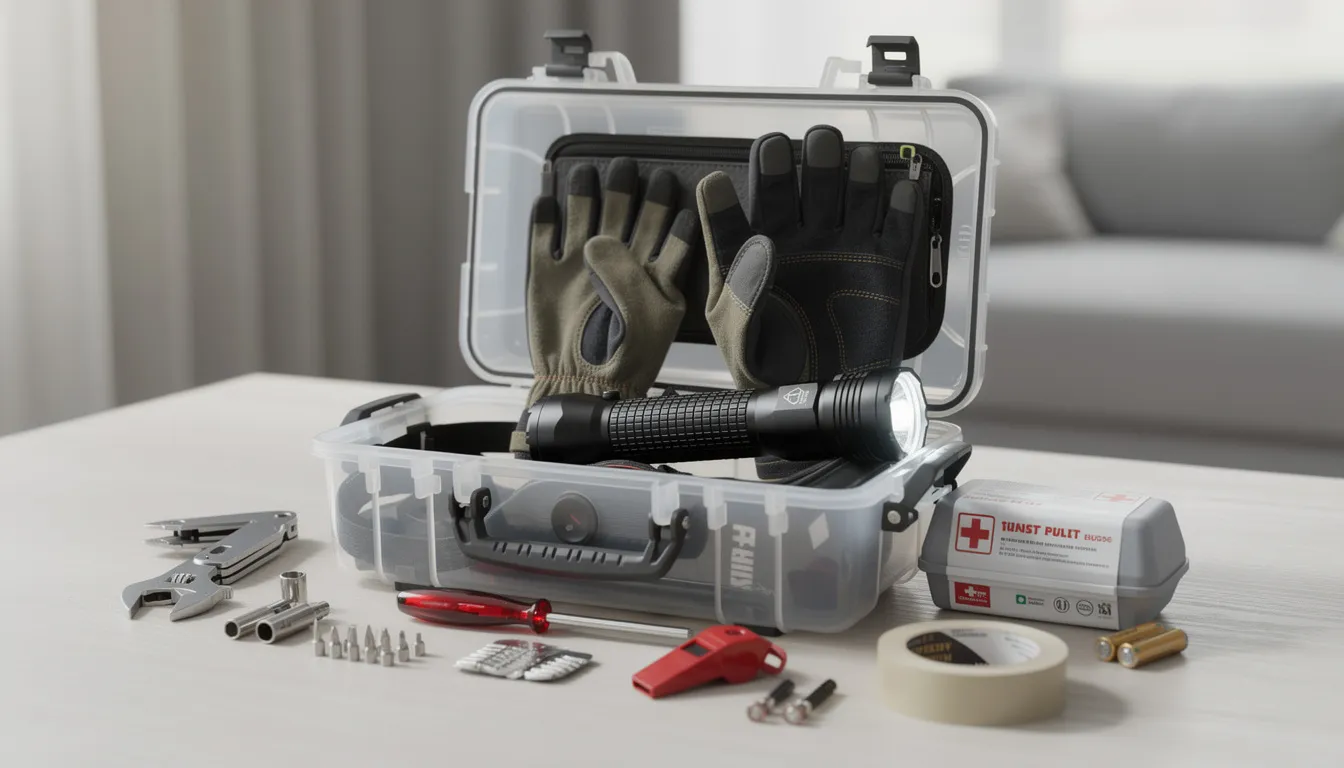
Prepare before an emergency—assemble a water emergency kit:
Flashlight with fresh batteries
Waterproof gloves
Plastic sheeting and heavy-duty trash bags
Rubber boots for navigating contaminated water
Copy of important phone numbers: plumber, water mitigation company, insurance company
Basic tools: adjustable wrench (for shutoff valves), utility knife
Conclusion: Why Fast, Professional Water Mitigation Matters
Water mitigation is the critical first step after any serious leak or flood. The process focuses on stopping the source, removing water, and preventing further damage—actions that can dramatically reduce long-term costs and health risks when executed quickly and properly.
Remember the key distinction: water damage mitigation is emergency stabilization performed in the first 24 to 72 hours, while water damage restoration is the repair and reconstruction phase that follows. Both are usually required to fully recover from a water incident, but mitigation sets the foundation for everything that comes after.
Key takeaways:
Quick action—ideally within the first 24 hours—significantly reduces the risk of mold growth, structural problems, and escalating repair costs
Professional mitigators bring commercial grade equipment and expertise that most homeowners don’t have access to
Understanding water mitigation helps you communicate effectively with your restoration company and insurance company
Documentation during mitigation directly supports your insurance claim
A better understanding of your policy before an emergency helps you respond more effectively when water damage occurs
Proactive steps you can take today:
Review your homeowners insurance policies for water-related exclusions and coverage limits
Identify whether you need a separate flood insurance policy based on your location and risk factors
Research and save contact information for a trusted local water mitigation company
Assemble a basic water emergency kit
Know where your main water shutoff valve and electrical panel are located
Proactive planning transforms a potential disaster into a manageable, recoverable event. When you understand water mitigation—what it involves, when to call for help, and how it works with your insurance—you’re positioned to protect your property and minimize disruption to your life.
Latest news